Showing posts with label diy. Show all posts

Monday, April 26, 2010

Greek Crostini Recipe.

WRITTEN and EATEN by Felicia Mcclinton
If You Don’t Make these Healthy Mediterranean Recipes Now, You’ll Hate Yourself Later

Ingredients
  1. 1000 grams of bread
  2. 200 grams of Greek Kalamata Olives
  3. 100 grams of Greek Feta Cheese
  4. 8 tablespoons of Olive Oil
  5. 1 clove Garlic
  6. Salt and Pepper
This recipe is perfect for 8 persons and you can prepare it in 35 minutes. It is a very flavorful and sumptuous dish inspired by the Greek feta croutons and black olives. This is also one of the easiest recipes to prepare.

Preparation

Make 1.5-inch thick slices of bread. Place the sliced bread in the oven or toaster. Rub garlic on each slice of bread after toasting.Meanwhile, cut the feta cheese into small cubes. Cut the olives into quarters or halves. In a separate mixing bowl, mix the cubed feta cheese and olives and season with olive oil. Make sure the toasted breads are still hot before sprinkling the cheese and olive mixture. Serve and Enjoy.

Nutritional Value:

Food

Gr

Kcal

Fat

Carb

Pro

Fib

Water

White bread 00

1000

2900

0

680

80

30

290

Black olives

200

470

33

18.4

23.6

0

116.4

Greek cheese, feta

100

264

21.28

4.09

14.21

0

55.22

Olive oil

20

176.8

20

0

0

0

0

Garlic

2

2.98

0.01

0.66

0.13

0.04

1.17

Salt

2

0

0

0

0

0

0

Pepper

2

5.1

0.07

1.3

0.22

0.53

0.21

Total

1326

3818.88

74.36

704.45

118.16

30.57

463

A head (8)

165.75

477.36

9.3

88.06

14.77

3.82

57.88

Per 100 grams

100

288

5.61

53.13

8.91

2.31

34.92


Felicia Mcclinton is a Guest Star/ Guest Writer for Good Food Toronto. She writes for mediterraneanrecipes.org. Her personal hobby blog focuses on cooking tips to eat like a real Mediterranean and eat healthy to prevent diseases.

Wednesday, August 26, 2009

DIY Biscotti.

WRITTEN and EATEN by Yili Wang

If you love coffee or nuts, you will love these biscottis. This recipe is adapted from Giada’s Holiday Biscotti recipe.
I like to credit myself for taking these biscottis to the next level though. I add an insane amount of nuts, including walnuts, almonds, pecans, brazil nuts (whatever you prefer) in addition to the REQUIRED pistachios and dried cranberries. The lemon zest gives these biscottis an extra kick and really balances out the buttery taste because I’m not a big fan of the latter. I have made them with the chocolate dip but prefer them without. I also bake them for a slightly shorter period of time, just a bit harder than a typical cookie. This way, I can enjoy them without the usual java dunk. Be warned that you should cut them while warm and the more nuts you include the more difficult it is to cut without the pieces crumbling on you. But really, that means the more pieces to snack on. They also make impressive gifts as they look gorgeous.

Holiday Biscotti

Recipe courtesy Giada De Laurentiis

  • 2 cups all-purpose flour
  • 1 1/2 teaspoons baking powder
  • 3/4 cup sugar
  • 1/2 cup (1 stick) unsalted butter, room temperature
  • 1 teaspoon grated lemon zest
  • 1/4 teaspoon salt
  • 2 large eggs
  • 3/4 cup pistachios, coarsely chopped
  • 2/3 cup dried cranberries
  • 12 ounces good-quality white chocolate, chopped
  • Red and green sugar crystals, for garnish

Directions

Preheat the oven to 350 degrees F.

Line a heavy large baking sheet with parchment paper. Whisk the flour and baking powder in a medium bowl to blend. Using an electric mixer, beat the sugar, butter, lemon zest, and salt in a large bowl to blend. Beat in the eggs 1 at a time. Add the flour mixture and beat just until blended. Stir in the pistachios and cranberries.

Form the dough into a 13-inch long, 3-inch wide log on the prepared baking sheet. Bake until light golden, about 40 minutes. Cool for 30 minutes.

Place the log on the cutting board. Using a sharp serrated knife, cut the log on a diagonal into 1/2 to 3/4-inch-thick slices. Arrange the biscotti, cut side down, on the baking sheet. Bake the biscotti until they are pale golden, about 15 minutes. Transfer the biscotti to a rack and cool completely.

Stir the chocolate in a bowl set over a saucepan of simmering water until the chocolate melts. Dip half of the biscotti into the melted chocolate. Gently shake off the excess chocolate. Place the biscotti on the baking sheet for the chocolate to set. Sprinkle with the sugar crystals. Refrigerate until the chocolate is firm, about 35 minutes.

The biscotti can be made ahead. Store them in an airtight container up to 4 days, or wrap them in foil and freeze in resealable plastic bags up to 3 weeks.


Yili Wang is a Guest Star/ Guest Writer for Good Food Toronto. She is a Dental student from UBC who grew up and lived in Toronto before moving to Vancouver. Her love of food goes beyond eating good food as she spends lots of free time learning and improving her culinary skills.

Thursday, August 20, 2009

DIY Apple Coffee Cake.

WRITTEN and EATEN by Yili Wang

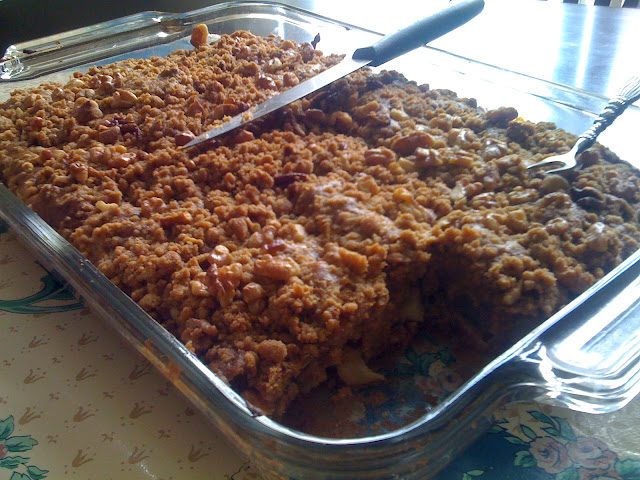
Dieters beware! Do not read the following. No matter how much you convince yourself that you are making these “for friends”, honourable attempts to resist these amazing treats are futile. The smell of the apple coffee cake is enough to win over the most hard-core dieters and self proclaimed dessert haters. That is if you are not a mutant who does not enjoy the devilish combination of cinnamon (FYI, excellent for those suffering from an overgrowth of yeast in the intest
ines), butter, brown sugar and apples.
I was first introduced to this cake when my classmate’s wife made it for our potluck Friday PBL breakfast sessions. I immediately asked for the recipe and was delighted to discover that it was a simple Emeril Lagasse recipe. I mean if the dessert is going to be a hassle to make, meaning complex pastry chef level techniques, time consuming, too many dishes to clean afterward or simply obscure costly ingredients that I will never use again, I might as well buy it. FYI, Dufflet company offers excellent desserts.

I did make some slight changes to the original recipe.
  • 1. I added more apples and Granny Smith apples work the best.
  • 2. I only used 1 cup of brown sugar instead of 1.5 cups.
  • 3. I did not include the caramel sauce.
  • 4. I added tons of coarsely chopped walnuts and pecans both in the batter and topping.
Again, see what you like and adjust the recipe to your taste buds. You cannot go wrong. The biggest mistake is not making this cake.

Apple Coffee Cake with Crumble Topping and Brown Sugar Glaze

Recipe courtesy Emeril Lagasse, 2002

Ingredients

Cake:

  • 1 stick plus 2 teaspoons unsalted butter
  • 1 1/2 cups packed light brown sugar
  • 2 large eggs
  • 2 cups all purpose flour
  • 1 teaspoon baking soda
  • 1 teaspoon ground cinnamon
  • 1/2 teaspoon salt
  • 1 cup sour cream
  • 1 teaspoon pure vanilla extract
  • 2 cups peeled, cored and chopped apples

Crumble Topping:

  • 1/2 cup packed light brown sugar
  • 1/2 cup all purpose flour
  • 1/2 teaspoon ground cinnamon
  • 4 tablespoons unsalted butter, softened

Brown Sugar Glaze:

  • 1/2 cup packed light brown sugar
  • 1/2 teaspoon vanilla extract
  • 2 tablespoons water
Directions
Preheat the oven to 350 degrees F. Lightly grease a 13 by 9-inch glass baking dish with 2 teaspoons of the butter.

In a large bowl, cream together the remaining stick of butter and sugar until light and fluffy. Add the eggs 1 at a time, beating after the addition of each. In a separate bowl or on a piece of parchment, sift together the flour, baking soda, cinnamon, and salt. Add to the wet ingredients, alternating with the sour cream and vanilla. Fold in the apples. Pour into the prepared baking dish, spreading out to the edges.

To make the topping, in a bowl, combine the sugar, flour, cinnamon, and butter, and mix until it resembles coarse crumbs. Sprinkle the topping over the cake and bake until golden brown and set, 35 to 40 minutes. Remove from the oven and let cool on a wire rack for at least 10 minutes.

To make the glaze, in a bowl, combine the sugar, vanilla, and water and mix until smooth. Drizzle the cake with the glaze and let harden slightly. Serve warm.


Yili Wang is a Guest Star/ Guest Writer for Good Food Toronto. She is a Dental student from UBC who grew up and lived in Toronto before moving to Vancouver. Her love of food goes beyond eating good food as she spends lots of free time learning and improving her culinary skills.

Friday, August 14, 2009

DIY Banana Bread.

banana bread... I woke up one morning (or early afternoon) and I had nothing to eat at home, but just happened to have 3 super ripe bananas that needed to be thrown out if they were there for another day. Instead of wasting these bananas, I decided to deal with both the bananas and my hunger by making some tasty Banana Bread with my friend Yili. I used to work in the pastry section at Richtree (aka Marche) so I do have a little bit of baking experience (Yili also worked there too). Even with no experience though, this recipe is super easy to follow and the result will be some perfect tasting banana bread.
Ingredients:
8 Tbsp butter
1 Cup Sugar
2 Eggs
2 Cups Flour (I used a little less because I didn't have any left)
1 Tsp Baking Powder
1/2 Tsp Salt
1/2 tsp baking soda
3 ripe bananas, mashed up
Optional:
1 handful of Chocolate Chips
1 handful of Craisins (dried cranberries)

Instructions:
  1. Preheat Oven to 350° F
  2. Mix butter and Sugar in a Large bowl until it is creamy, then beat eggs into the mixture
  3. Mash Bananas up and mix it up into the previous bowl
  4. Sift Flour, Baking Soda, Baking Powder, Salt together and add to wet mixture
  5. Throw in the optional Chocolate Chips, Craisins
  6. Butter your Pan up, or use a Silicon non-stick one like I did
  7. Spread the Batter into the Pan evenly and bake for 1 Hour at 350° F
  8. Eat the Banana Bread!

Monday, May 25, 2009

DIY Hot Pot.

hot pot... A popular Chinese style of eating where you cook raw food items in boiling soup on a the table is called Hot Pot. Everyone eats around the pot and cooks prepared raw food items such as different kinds of vegetables, meat and noodles. As you cook the food for longer, the soup also gets more flavorful, giving even more flavor to food items you put in later. It is a great way to have a relaxing meal with friends as it is very casual. You can chill, eat and have fun all at the same time!
For this particular "Hot Pot Session," my friend, Florence prepared all the food (she was also the one who prepared the DIY Korean BBQ meal). We used the same "Tiger Brand" cooker that we used for the DIY Korean BBQ meal, as it doubles as a "Hot Pot Pot" if you replace the grill with the pot. There were about 7 of us, so we had lots of food available. Some of the food items that we had included sliced beef, sliced pork, sliced lamb (which is all prepared in thin slices specifically for Hot Pot). We also had beef balls, fish balls and Korean dumplings. For those of us who weren't pure carnivores, there was also a wide selection of vegetables such as napa cabbage, bok choy, enoki mushrooms, tofu and some other stuff.
One of the most key parts to hot pot is preparing a dipping sauce. Some people like just use soy sauce to dip their hot pot cooked food items and others like to customize their sauce with satay sauce, soy sauce, peanut sauce, hot sauce and anything else mixed together. An example of this is the simple yet tasty sauce that my friend Jess makes.

Jess' Famous Dipping Sauce:
  • Ingredients: Soy Sauce, Egg, Satay Sauce
  • Pour Soy Sauce into a bowl and mix it with one or two spoonfuls of Satay Sauce
  • Crack an egg and pour the entire raw egg into the sauce
  • mix it up!.... dip anything and everything into it!
Some people might be turned off by using the raw egg, if you are you could cook the egg in the hot pot for awhile, but don't overcook it, or else it'll just be a hard boiled egg (which is awesome to eat during Hot Pot as well. The runny egg mixed with the soy sauce helps coat whatever food item you dip into the sauce and tastes HELLA good!
Later in the meal, we also threw in some Udon noodles and served bowls of Udon noodle soup with vegetables, meat and whatever was left. In addition to this, we also had yam noodles, which are prepared and eaten in knots (as in...tied in knots). These have a chewy texture and go great in Hot Pot. We also had alot of Baked Sea Bass ..mmm (quick recipe in previous post). Everything in this Hot Pot meal was bought at the T & T Supermarket Downtown (222 Cherry Street), except for the baked sea bass.

Saturday, May 16, 2009

DIY Sushi Pt. 2.

sushi @ home... In a past entry, I wrote about my friend, Sushi Master Chris, who makes sushi meals at home for his friends and family. This time, he called me up to go to his house to try his delicious Japanese creations. When I got over to his place, he was already hard at work, cutting up fish and rolling up sushi rolls. Chris' team consisted of him and his mom, who managed most of the cooked items that were used in the sushi and rolls (ie. tempura, unagi).
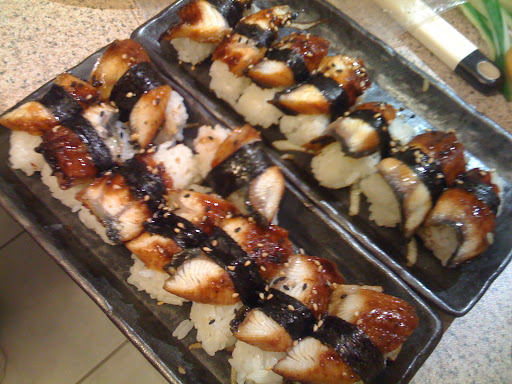
Chris made a huge selection of food, including Sashimi, Nigiri, Maki and Tempura (Shrimps and Vegetables). He bought fresh pieces of Sushi grade Red Tuna, Yellow Tail Fish and Salmon. Seeing the Sashimi pieces in huge chunks looked awesome and all he had to do was cut it up into slices for us to enjoy. He bought the sushi grade yellowtail and the Tuna pieces from Diana's Seafood Delight and the sushi grade salmon from H Mart (see previous post for more info). Using these same sashimi pieces, he also cut them into smaller slices to make nigiri sushi (the ones with a chunk of rice and a slice of fish on top. These tasted awesome, as he also put a bit of wasabi underneath each piece of fish like they do in the restaurants. For the nigiri sushi, he also made some unagi eel ones out of store bought prepared unagi.
Video of Chris' sushi making skills in action:

In terms of sushi rolls or maki, he made some black dragon rolls (tempura shrimp inside, unagi and avocado on top), california rolls (avocado, imitation crab meat, cucumbers, avocado and flying fish roe) and some spicy salmon rolls (raw salmon with spicy sauce). For the california rolls, Chris even prepares his own personal mango sauce that tastes great with the roll.
Video of Chris making a black dragon roll:
Chris also bought some fresh uni (sea urchin) from Diana's Seafood Delight. I had not seen uni being prepared in person before, so this was pretty cool. He cut open the uni and scooped out the insides, which is the edible part. He then made this into sushi pieces with seaweed wrapped around it. Uni definitely seems like an acquired taste, as the strong taste turned many people off who were trying it for their first time.
Everything that he made tasted great and Sushi Master Chris definitely earned the Good Food Toronto seal of approval.lol. I especially enjoyed the fresh salmon, yellowtail and tuna sashimi that he just cut up in front of us for us to eat. For more info on where to buy these, refer to my previous post.

We ended up splitting the cost of the materials between our friends. It came out to around $15 each and we were all very satisfied and full. Everyone had a great time watching Chris' mad skills in sushi making and tasting his delicious Japanese creations.

I'd like to thank Chris and Mrs. Wong (his mother), for having us over and sharing their love for making and eating sushi with us.

Wednesday, April 22, 2009

DIY Sushi.

sushi @ home... That is what my friend, Chris- the sushi expert, likes to to do when he has free time (not the same friend as the one who does Korean BBQ at home). He holds these crazy sushi parties and spares no expense on taste, quality and variety of dishes that is served (according to him, it ends up costing about $15/person, and everyone is satisfied!). Not only does it tastes good, but the process of making the sushi is fun as well. The selection includes appetizers such as seaweed salad, and tempura (including shrimp and vegetables!). As you can see in the pictures, Chris also makes different types of sushi including salmon, tuna, unagi, uni and scallop. The best looking and most impressive stuff are the rolls, as they look just like the ones from the restaurants where they are usually like ~$10 each. I'm not really sure of the names of the rolls, but the ones with the tempura shrimp inside are just like those dragon rolls you can get at restaurants...sooo good! You can see he even gets the Tobiko to use for the rolls and sushi pieces. Since the types of raw fish being bought are sushi grade, sashimi is on the menu as well (from the pics, there is salmon, tuna and sweet shrimp sashimi... I actually feel hungry right now, no jk).Quick Notes: So..now you've seen the wonderful sushi that one can make at home and you're probably wondering: Where can I buy the stuff to make this?!... Well.. according to our sushi expert, Chris, This is no easy task. He has to run around Toronto going to different places for different things. For the quality stuff like Uni and Tuna, he goes to Diana's Seafood Delight. Sushi grade Salmon and Scallops are bought from H Mart Korean Supermarket in Richmond Hill (9737 Yonge St.) , where the Salmon is usually $9.99/lb (but it is often on sale for $7.99/lb). He also gets his Unagi at H Mart ($10.98/ 2 big pieces, good quality stuff according to Chris). Finally, he gets the octopus at J Town (at Steeles/ Woodbine, 3160 Steeles Ave. E). You could get everything at one place, but for the best quality/value, it is worth your time to run around Toronto making sure you get the best of everything. (located around Lawrence/Kennedy, check the link for exact location).
...I will be seeing him next weekend to personally review and eat all his food, so I will keep you posted on exactly how good of a sushi master Chris is and if he deserves the Good Food Toronto stamp of approval. lol.

Wednesday, April 1, 2009

DIY Korean BBQ.

wow... I just realized that I have been eating a lot of Korean food lately but thats ok because its so good. Last week, my friend held a homemade DIY (do it yourself) Korean BBQ party. You're probably thinking, "How Asian!" but you're probably also wishing you were there as it was crazy good. She got some quality meat from the Galleria Korean Supermarket (7171 Yonge Street). The selection included Pork Belly ($??), Short Ribs ($8.99/lb) and deboned Short Ribs ($19.99/lb). You can see in the pictures that even before we grilled them, the meat looks awesome in the package. The korean style pork belly is basically the most tasty and savoury bacon imaginable. When having an at home Korean BBQ, you gotta have an indoor grill as well (we used a Tiger Brand one). In addition to this, we had some tasty Kimchi (pickled cabbage) and Kimbop (korean sushi rolls). My friend isn't as much as a carnivore as the rest of us, so its good that we had bell peppers, zucchinis, mushrooms and corn to throw on the grill. Another amazzzing dish that we had to complement our feast was a baked Sea Bass that my friend prepared, which was perfectly crisp on the outside and tasted delicious all around (quick recipes @ bottom of post).
It is also great to have lots of fresh lettuce on hand to eat along with the bbq'd meat. It tastes really good to grab a piece of lettuce and put some rice,bbq ribs, korean bbq sauce and hot sauce on it. To quote my friend, "It is an explosion of flavours in your mouth!" She does not lie, I tried it.
We finished the meal off with some tasty Melona Bars and XiangXie pears, which I have posted about before.mmm
Baked Sea Bass Recipe
  1. Defrost "frozen sea bass" and cover it with salt & pepper, soy sauce, garlic pepper and a little bit of sugar.
  2. Put the marinated fish into a baking pan lined with aluminum foil
  3. Bake at 400 Degrees F for about 35 mins... enjoy!
Marinating the Meat (ex. ribs)
  1. Cut Short Ribs (or any meat you wish to bbq) into small pieces (about 3 inches)
  2. Put meat into ziplock bag, pour in Korean BBQ/Bugolgi Sauce and sliced onions ...shake vigourously
  3. Let it sit in fridge over night, grill it up...sooooooo gooood. enjoy!